
How to Replace Rubber Seal on UPVC Windows | GB DIY Store
In the home, heat escapes when you have poor insulation. One of the biggest culprits is windows. This means whether through draughts, gaps or open windows, your insulation is costing you. The good news is that replacing window seals is a straightforward DIY task that requires no special tools and can dramatically improve your home's comfort and reduce heating costs.
In this guide, we'll cover everything you need to know, including how to identify your seal type, select the correct replacement, and install it professionally, all without needing to call a tradesperson.
Understanding Your Window Seal Type
The first thing you need to know is what type of window seal is currently installed. This is crucial because ordering the wrong type will result in an ineffective seal and wasted money.
Bubble Gasket Seal
What is a Bubble Gasket Seal?
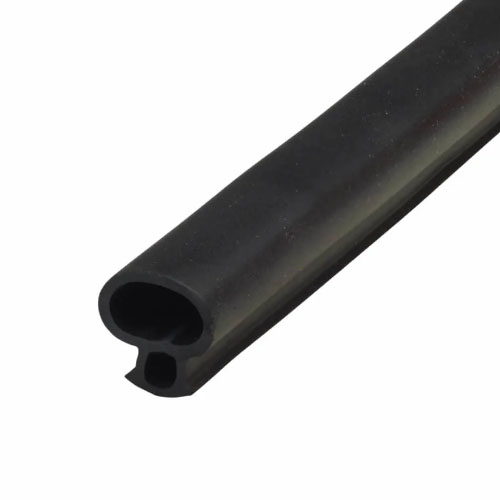
A bubble gasket seal is a common type of seal found in uPVC windows and doors. It's installed around the window opening, where the opening sash meets the frame, and sometimes around the glass itself. The distinctive feature is its bubble-shaped profile (either round or oval) and an arrowhead base that helps keep it securely in place within the groove.
Key Characteristics:
- Round or oval-shaped "bubble" that compresses when the window closes
- Arrowhead or T-shaped base for secure fixing
- Flexible rubber construction
- Available in various bubble heights
- Can have a "flipper" extension for enhanced compression
Signs Your Bubble Gasket Needs Replacing
So, when should you replace a bubble gasket? You should replace your bubble gasket seal if you notice:
- Visible flattening: The bubble no longer springs back when pressed
- Draughts around the window: You can feel cold air coming through when the window is closed
- Increased condensation: Moisture forming on the inside of windows
- Higher energy bills: Your heating costs have noticeably increased
- Shrinkage: The seal has pulled away from the corners, leaving gaps
- Brittleness or cracking: The rubber feels hard and shows visible damage
- Mould growth: Black spots or mould forming on the seal itself
Replacing a Bubble Gasket Replacement
Replacing a bubble gasket is a simple task, but you need to make sure you use the correct size seal. Picking the correct seal can be very difficult, but that’s where we can help:
Step 1: Remove a Sample: Take a small section of your existing seal (about 10-15cm) from an inconspicuous area. This will help you compare profiles.
Step 2: Measure Key Dimensions:
- Bubble height: Measure from the base to the top of the bubble
- Base width: Measure the width of the arrowhead or T-base
- Overall profile: Note whether it's round, oval, or has a flipper extension
Step 3: Test for Fit: The best way to find the right size is to obtain samples of the rubber seal and test them in your uPVC windows. Remember, the seal doesn't have to be the same as the one you are replacing. You can use a seal which looks a little different, as long as:
- It provides a good compression seal when the window is closed
- The arrowhead is large enough to hold it securely in place
- The bubble height suits your window gap
At GB DIY Store, we understand how challenging it can be to select the correct seal size. That’s why we offer a range of products sold by the metre to make it super easy for you to test multiple profiles in your windows and select the perfect match.
You can view our range of bubble gasket seals here.
How to Install Bubble Gasket Seal
Now that you have your replacement bubble gasket rubber seal. This style of seal requires no tools; it just pulls out with your fingers and can be installed in the same way.
Step-by-Step Installation:
- Remove the Old Seal
- Locate the end of the existing seal (usually in a corner)
- Pinch it firmly between your thumb and forefinger
- Pull steadily along the groove; it should come out easily
- If sections are stuck, gently ease them out with a flathead screwdriver
- Remove the seal from all four sides of the window frame
- Clean the Groove
- Use a dry cloth or brush to remove any dirt, debris, or old seal residue
- Check for any damage to the groove that might affect the new seal
- Ensure the groove is completely dry before installation
- Measure and cut your new seal. Make sure to complete all four sides of the uPVC window in one continuous length rather than four separate pieces. This ensures maximum effectiveness and eliminates corner gaps.
- Measure the perimeter of your window frame
- Add approximately 5-10cm extra to account for corners
- Cut the seal slightly longer; you can trim excess later
- Install the New Seal
- Start at a bottom corner of the window frame
- Press the arrowhead base firmly into the groove with your thumb
- Work along the groove, ensuring the seal is fully seated
- Use your fingertips to push the seal into place—it should click in securely
- Continue around all four sides in one continuous run
- Navigate the Corners
You may have some difficulty in the corners where the seal needs to turn sharply, and space is quite tight. If this happens:
- Don't force it, as this can damage the seal or groove
- Just cut away a small section of the arrowhead in the corner (about 5-10mm)
- This allows the seal to sit flat and turn the corner smoothly
- The bubble portion still provides the seal; the missing arrowhead won't affect performance
- Join the Ends
- Overlap the start and end points by about 10mm
- Cut cleanly through both layers at an angle
- Remove the excess and press the join firmly into place
- The angled cut creates an almost invisible joint
- Test the Installation
- Close the window and check for even compression along the seal
- Feel for draughts around the edges
- Check all corners are properly sealed
- Open and close the window several times to ensure smooth operation
Wedge Gasket Seals
What is a Wedge Gasket Seal?

A wedge gasket seal is found installed around the glass unit itself, between the glass and the uPVC beading (the plastic trim that holds the glass in place). It isn't used on all windows, but it's common in many double-glazed units.
Key Characteristics:
- Wedge-shaped profile that tapers from thick to thin
- Typically black rubber construction
- Sits between the glass unit and the frame or beading
- Various sizes to accommodate different glass thicknesses
- Creates compression to hold the glass firmly
Why Wedge Gaskets Matter
If your wedge gasket seal on your uPVC window begins to perish, this could lead to issues such as:
- Compression issues: The glass unit becomes loose and can rattle
- Broken-down glass units: Loss of seal can lead to condensation between panes
- Water ingress: External moisture can penetrate around the glass
- Reduced insulation: Gaps allow heat transfer and cold spots
- Structural problems: Loose glass is a safety hazard
Signs Your Wedge Gasket Needs Replacing
Replace your wedge gasket if you notice:
- The glass unit feels loose or rattles when touched
- Visible gaps between the glass and the frame
- Water around the glass edges
- The existing seal is cracked, split, or missing entirely
- Condensation forming between the glass panes (though this often indicates glass unit failure)
Measuring for Wedge Gasket Replacement
The best way to find the right size is to obtain samples of the rubber seal and test them in your uPVC windows. It’s important to remember that the seal doesn't have to be the exact same as the one you are replacing. The replacement will work if:
- It holds its place firmly and wedges the glass securely
- It isn't loose or doesn't compress enough
- The profile fits properly between the glass and frame
To measure your wedge gasket:
- Remove a section of existing seal (you'll need to remove the beading)
- Measure the height of the wedge at its thickest point
- Note the angle of the wedge taper
- Measure the base width where it sits against the glass
At GB DIY Store, we provide sample packs of wedge gaskets, which come labelled with our product codes. You can view our range of wedge gasket seals here.
How to Install Wedge Gasket Seal
Now that you have your replacement wedge gasket seal, installing it should be a cinch, though it requires a bit more care than bubble gaskets.
Tools You'll Need:
- Stiff putty knife or glazing spatula
- Clean cloth
- Spray bottle with water
- Scissors
Step-by-Step Installation:
- Remove the Beading
The beading is the plastic trim that holds the glass in place. You need to remove this to access the wedge gasket.
- Start with a side bead (not the bottom one, as the glass weight makes it harder)
- Insert your putty knife between the bead and frame at the middle point
- Gently prise the bead away from the frame; it should click out
- Work towards the ends, gradually releasing the bead
- Remove the other side bead, then the top bead
- Leave the bottom bead until last, as it supports the glass weight
- Important: Support the glass as you remove the final bead. Have someone help you with the larger windows
- Remove the Old Wedge Gasket
This style of rubber seal will require a scraper to help prise the old one from the window.
- Use your putty knife or glazing spatula to carefully remove the old seal
- Work gently to avoid scratching the glass or frame
- Remove the seal completely, including any stuck fragments
- Check both the glass edge and the frame
- Clean the Area
- Wipe the glass edges clean with a dry cloth
- Remove any dirt, old sealant, or debris from the frame rebate
- Ensure surfaces are completely dry before installing the new seal
- Measure and Cut New Seal
Installing the new one can be done by just pushing it in with your fingers.
You will need to install this gasket in four sections: one for each side of the window.
Important cutting tip: When cutting each length, make sure to cut it about 1cm too big and push the extra seal into the corner. This will counteract any shrinkage issues over the years and ensure a tight, lasting seal.
- Install the New Wedge Gasket
- Start with the bottom edge of the glass
- Press the wedge gasket firmly against the glass edge
- Work along the length, ensuring it's fully seated
- If you find it difficult to push in, spray some water on the face of the glass to help lubricate the area
- The water acts as a lubricant and evaporates once the seal is in place
- Repeat for all four sides, ensuring each piece is cut 1cm oversized
- Refit the Beading
- Start with the bottom bead first
- Position it carefully and tap it gently into place using the palm of your hand
- Work methodically around the bottom, sides, and then the top
- Ensure each bead clicks fully into the frame
- Check that the glass sits centrally with even gaps all around
- Test the Installation
- Check the glass is secure and doesn't rattle
- Inspect for even compression around all edges
- Ensure no gaps are visible between the glass and frame
- Test window operation—it should open and close smoothly
Benefits of Replacing Your Window Seals
Investing time in replacing worn window seals delivers multiple benefits:
- Reduced Energy Bills
Effective seals can significantly reduce heat loss, lowering your heating costs.
- Improved Comfort
No more cold draughts, cold spots near windows.
- Noise Reduction
Good quality seals dramatically reduce external noise from traffic, neighbours, and weather.
- Condensation Control
Properly sealed windows reduce condensation formation, helping prevent mould.
- Enhanced Security
New, properly fitted seals make windows harder to force open, adding security.
- Extended Window Life
Protecting your windows from moisture and thermal stress extends their lifespan significantly.
- Increased Property Value
Well-maintained, draught-free windows are an attractive feature for potential buyers.
Common Mistakes to Avoid
- Using the Wrong Size Seal: Always test samples before ordering full lengths. Using the wrong profile wastes money and won't solve your draught problems.
- Stretching the Seal During Installation: This causes the seal to spring back, creating gaps. Install at natural length.
- Installing in Multiple Pieces: For bubble gaskets, use one continuous length around all four sides for maximum effectiveness.
- Cutting Wedge Gaskets Too Short: Always cut 1cm oversized to compensate for thermal shrinkage.
- Forcing Beading Back On: If beading doesn't clip easily, check the gasket isn't protruding or the glass isn't misaligned.
- Skipping the Cleaning Step: Dirt and debris in the groove prevent proper seal adhesion and reduce effectiveness.
Why Choose GB DIY Store for Your Window Seals?
At GB DIY Store, we specialise in providing everything you need for uPVC window and door repairs and maintenance and stock an extensive selection of window and door seals.
Our sample packs take the guesswork out of selecting the right seal. Test multiple profiles in your actual windows before committing to a full order—ensuring you get it right the first time.
Not sure which seal you need? Our knowledgeable team is always happy to help. Call today on 01623 622205 and allow us to help you find the perfect fit for your home. For more information, take a look at our handy Seal Centre resource.
Recent Posts
-
Choosing Window Handles for a Victorian Home: Style & Security
Victorian homes are some of the most beautiful properties in the UK, combining timeless style with t …27th Mar 2026 -

Childproofing Bedroom Windows and Doors: A Parent's Safety Guide
A busy home can be tricky to stay on top of, especially if you want to keep wandering kids and adven …13th Feb 2026 -
New Euro Cylinders for 2026: Better Protection for Your Home
Home security never stops improving, and neither do the criminals trying to get past it. For years, …29th Dec 2025